
CORUS Messaging in a Provider Role
As a provider in CORUS, you can expect to receive messages on your preferred mobile device regarding the delivery of patient care. Within CORUS, you’ll receive questions about the status of an order, learn about the day’s cases or even receive critical findings. CORUS works seamlessly with smartphones, pagers and VOIP phones, such as Ascom.
Step 1: Mobile Setup
To receive notifications on your pager or via SMS text message, please follow the appropriate instructions: Pager Setup or SMS Cell Phone Setup
Step 2: Login to CORUS
Your first time login experience to CORUS is unique. To get started, open a web browser such as Chrome, Safari or Firefox and visit https://jh.teamcorus.com.
Enter your login credentials, and, if prompted, allow your browser to send notifications. Next, you’ll see CORUS’ Terms of Service, which you’ll need to accept in order to proceed. After you accept these, you’ll be taken into CORUS and will see a bouncing arrow telling you the most important part to getting started: to send a message.
Step 3: Take a Tour
Before you send your first message, take a moment to click around and familiarize yourself with the experience. The left panel contains most of the navigation you’ll use within CORUS. To the right of your name is a dropdown menu that reveals other personal settings including My Account and Out of Office. Your channel and direct message conversations also live within this space.
Step 4: Search
After you’ve updated your message signature, you’ll likely want to send a message. This is where CORUS search comes in to play. Click the Search button near the top of the screen to get started.
The CORUS directory consists of people, mobile devices, consults and channel groups. Control your results by checking on or off search options, which appear to the right of the search box.
Each object in the CORUS directory is also described with additional data called tags. Using the Advanced Filters option you’re able to limit your results to include objects that include tag descriptors such as “HCGH” or “Cardiology.”
Step 5: Compose and Send
After you’ve selected your message recipient, compose your message, verify your message signature and click the paper airplane to send your message. This will launch a new view called a room in which you and your colleague can continue the conversation.
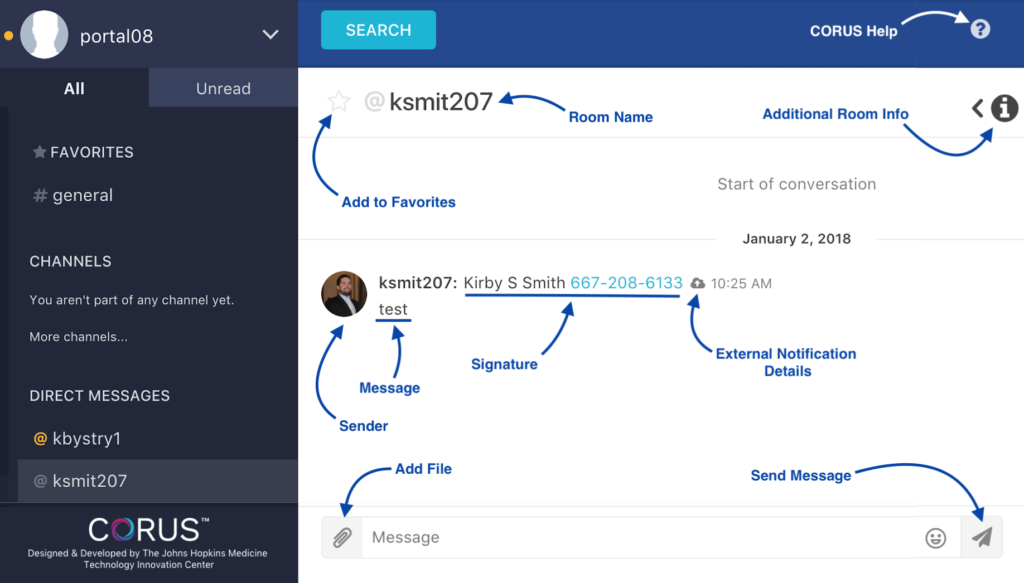
Step 6: Room Chat
From a web browser, you can continue the conversation with this recipient. At the bottom of the room view, you’ll see a message box and the familiar paper airplane send button. Within this view, there are other important details:
Step 7: Follow Up
Pay attention to instructions given to you in the sender’s message signature. Many nurses do not have mobile devices in CORUS for notification and may prefer you give them a call back. CORUS will alert you when this condition occurs and will use CORUS.bot to provide you with additional details. Don’t ignore these!