CORUS Messaging in a Nursing Role
If you’re a nurse using Team CORUS, you’ll use this website to contact other care team members during the administration and delivery of patient care.
Step 1: Login to CORUS
Your first time login experience to Team CORUS is unique.
- Go to https://jh.teamcorus.com.
- Team CORUS may prompt you to allow browser notifications. Allow these.
- Team CORUS will ask you to read and accept Terms of Service. Accept these.
- After you accept, you’ll be taken into CORUS.
Step 2: Take a Tour
Before you send your first message, take a moment to click around and familiarize yourself with the experience. The left panel contains most of the navigation you’ll use within CORUS.
Click your user photo to reveal an additional menu that includes your personal settings including My Account your presence options.
Your channel and direct message conversations also live within this space. Visit this page for even more detail about what goes on in a channel or direct message room.
Step 3: Edit your Signature
CORUS makes it easy for your recipient to reply to your message. If you do not want a reply within CORUS, say so! Use your message signature to instruct your recipient to call the unit operator or the Ascom handset assigned to you at the start of your shift. Detailed instructions are located here.
Step 4: Search
After you’ve updated your message signature, you’ll likely want to send a message. This is where CORUS search comes in to play. Click the Search button near the top of the screen to get started.
The directory consists of people, mobile devices, consults and channel groups. Control your results by checking on or off search options, which appear to the right of the search box.
Step 5: Compose and Send
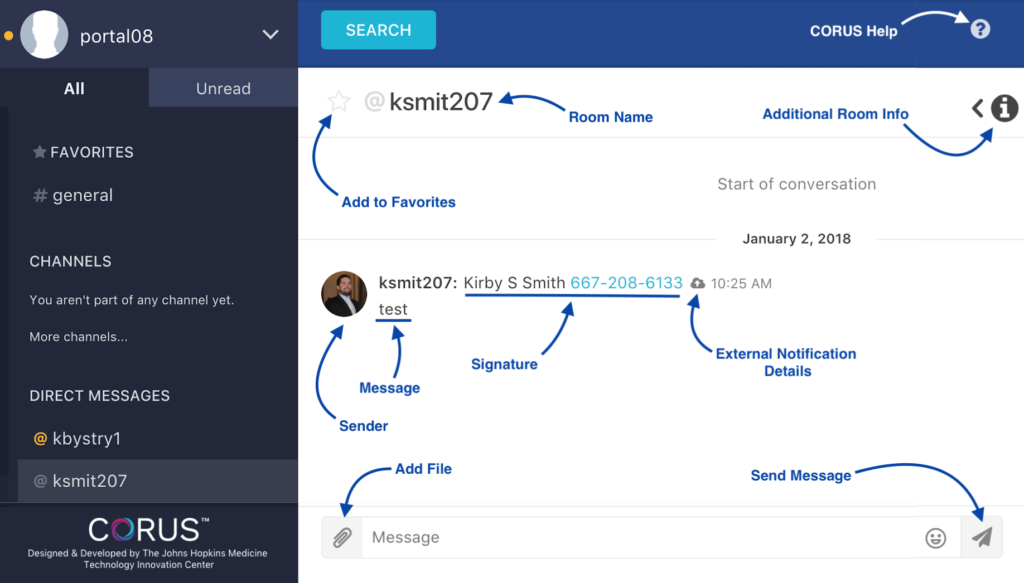
After you’ve selected your message recipient, compose your message, verify your message signature and click the paper airplane to send your message. This will launch a new view called a room in which you and your colleague can continue the conversation.
Step 6: Room Chat
From a web browser, you can continue the conversation with this recipient. At the bottom of the room view, you’ll see a message box and the familiar paper airplane send button. Within this view, there are other important details:

